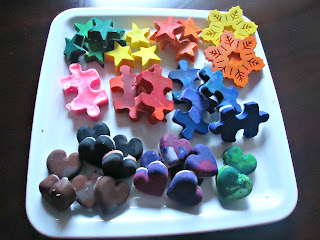
So to solve that problem, I found many tutorials on how to melt down your existing crayons and create your own using you own choice of molds. Most people used candy molds like the ones you find at craft stores, but since we had some old silicone ice cube trays from Ikea that we've used maybe once, I thought they'd work too.
First I prepared all my crayons; peeling the paper off. Aiden had about 3-4 different types of crayons - crayola, rose art, etc. They were also slightly different shades of each color, so I just mixed them together.
After they were separated and peeled, I broke them all into smaller pieces. Some needed to be cut up/shredded a bit just to get them to fit into the molds. No biggie, just took a little longer than I expected.
I turned the oven to 230° and put the silicone molds on cookie sheets to line them (to make it easier to put in/out of the oven). I've seen directions telling you to keep them in from anywhere from 5 min - 30 min, so I just checked every 5 or so to see how they were doing. In the end, they ended up "baking" for 20 minutes total. Some were melted before the other ones, so I just took them out when they were melted all the way through. If you're impatient like me, you can pop them in the freezer for a few to help you get them out of the molds, or just let them sit on the counter... Now if you have a VERY impatient kid, like mine, you'll probably go the freezer route.
He thought they were "so cool Mom!" and has asked to play with them most of the day (except when Jacob brought out his old Micro Machines from when he was a kid, but that's a whole other story...). There were a few things I'd probably change if I did these again:
1. I'd try to stick with one brand of crayon... some brands were "waxier" than others and created a weird film on the one side of the new crayon. Made it a little difficult for Aiden to color with at times.
2. I'd fill the molds a lot more than I did - obviously when they melt, they fill the mold differently than as a solid (duh) and therefore, the crayons didn't get as big as I'd hoped.
3. I'd let Aiden help more next time... I started working on it when he was down for his nap/quiet time, and by the time he got up, there was nothing for him to do other than watch the wax melt... not his idea of a fun time. I wasn't even completely sure that it would work, so I was a little skeptical of him helping.
He had fun with them - they do get messy though when you're using them, so I've made sure I had a box of wipes near by...
 |
| Of course he puts the puzzle pieces "together" |


Another Pinterest find? Nice one. You're the best mom.
ReplyDeleteThis blog has all the Pinterest projects that went horribly wrong. I swear, everything I try should be put on here http://pinstrosity.blogspot.com/ mine never go right
Thanks Nic :)
DeleteI love Pinstrosity - I'm on there all the time!