Wednesday, August 29, 2012

And Finally...

I finished the wardrobe cabinet and the "pie safe", whatever it's called... Now they're storage for all my fabric and scrapbooking things that was all over the house and computer area. It's nice to have a little organization, even if it isn't always going to last.
Anyways... here was the before:


And now here's the after:

Excuse the poor lighting, we don't have the best camera...
Original hardware was cleaned up and reused
 We found a Behr Porch and Floor paint in this barn red at Home Depot for $7 in the mis-tint section. The paint was designed for heavy duty (foot) traffic, but we figured it would work just fine for the amount of use these would get. Can't beat $7! I covered the shelves in wrapping paper, using spray adhesive to tack it down.


Saturday, August 25, 2012

DIY Shaped Crayons

As Aiden and I were coloring the other day, I noticed him struggling with his crayons; they were all too small for him to hold onto. When he colors, he's got a death grip on the crayons and ends up breaking them every.single.time...
So to solve that problem, I found many tutorials on how to melt down your existing crayons and create your own using you own choice of molds. Most people used candy molds like the ones you find at craft stores, but since we had some old silicone ice cube trays from Ikea that we've used maybe once, I thought they'd work too.

First I prepared all my crayons; peeling the paper off. Aiden had about 3-4 different types of crayons - crayola, rose art, etc. They were also slightly different shades of each color, so I just mixed them together.


After they were separated and peeled, I broke them all into smaller pieces. Some needed to be cut up/shredded a bit just to get them to fit into the molds. No biggie, just took a little longer than I expected.


I turned the oven to 230° and put the silicone molds on cookie sheets to line them (to make it easier to put in/out of the oven). I've seen directions telling you to keep them in from anywhere from 5 min - 30 min, so I just checked every 5 or so to see how they were doing. In the end, they ended up "baking" for 20 minutes total. Some were melted before the other ones, so I just took them out when they were melted all the way through. If you're impatient like me, you can pop them in the freezer for a few to help you get them out of the molds, or just let them sit on the counter... Now if you have a VERY impatient kid, like mine, you'll probably go the freezer route.


He thought they were "so cool Mom!" and has asked to play with them most of the day (except when Jacob brought out his old Micro Machines from when he was a kid, but that's a whole other story...). There were a few things I'd probably change if I did these again:

1. I'd try to stick with one brand of crayon... some brands were "waxier" than others and created a weird film on the one side of the new crayon. Made it a little difficult for Aiden to color with at times.

2. I'd fill the molds a lot more than I did - obviously when they melt, they fill the mold differently than as a solid (duh) and therefore, the crayons didn't get as big as I'd hoped.

3. I'd let Aiden help more next time... I started working on it when he was down for his nap/quiet time, and by the time he got up, there was nothing for him to do other than watch the wax melt... not his idea of a fun time. I wasn't even completely sure that it would work, so I was a little skeptical of him helping.


 He had fun with them - they do get messy though when you're using them, so I've made sure I had a box of wipes near by...

Of course he puts the puzzle pieces "together"

Friday, August 24, 2012

Birth Stat Canvases

I was on the lookout for new projects since I had no sewing needs at the moment, and am currently waiting for Jacob to customize the wardrobe cabinet (here), and found these adorable canvas prints of your child's birth stats (ie, weight, length, etc). Since canvas was on sale last week at Jo-Ann's, I picked up a few and decided to make my own. I've seen them on Etsy (did I just find my newest item to sell maybe??) going anywhere from $30-$80 each! I found one on Zulily for $90, some on Etsy, here, here, and here.

My practice hand-drawn one so I could figure out sizes...
  There are so many different ways you can do these, totally customizable. Most seemed to be painted on, but since I have no painting skills whatsoever, I decided to use the best tool at my disposal: the cricut. I ended up making 3 (no, I'm not pregnant...) because I messed up on Ava's and mod podge is really strong - I couldn't fix my mistake since it had dried, and had to do it all over again. Whoops... Now they're hanging on their bedroom doors, and Aiden "reads" his everyday! I used 12x12 canvas, and since they were half off, they were only $4.99 or so each... not bad!

Cute, huh?

Monday, August 20, 2012

Pie Safe?

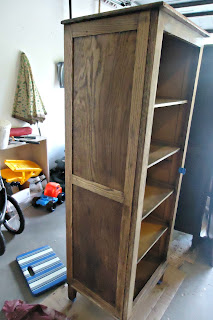
Jacob and I went to more estate sales this weekend (go figure); I think we have a problem... We can't pass up a good deal even if it becomes a hassle to haul them home. We went to a city about a half hour away (read: 1 hour total there and back) to look at these cabinets for our computer/office area thinking they'd be way to expensive, but worth a shot anyways.

Not the most attractive

We found them in the almost completely empty basement and they were marked $60 each, then half off... so only $30 each! How no one else picked them up I have no idea. Sure they had a little water damage on the bottoms but totally worth $30 a piece. Once Jacob measured the car we had for the weekend, we discovered only one would fit in there at a time. What is our deal with buying furniture that's too big to get home?? Anyways, so we loaded one up and drove home to drop it off, then got back in the car and drove all the way back again to pick up the other one.... So two hours of driving time for $60 worth of furniture... and as stupid as it may sound, it was completely worth it! Both my mom and Jacob's said they thought the smaller one looked like a Pie Safe... I suppose maybe it's possible? The larger one seemed to be a wardrobe closet, but again; not sure.


Ready for paint... ignore the junk in the background ;)
 

Instead of staining it, we decided to go a different route and paint it this time. Once I got all the old stain/varnish off, I found that both cabinets weren't the same style in terms of wood grain, color, etc. We found some great paint at Home Depot in the mis-tint section in the exact color we wanted, only $7!! Come back soon and see the end result! I hope to have them in the house by the end of the week!

Tuesday, August 14, 2012

Traffic Signs and an Update

I was browsing around on Pintrest last night, as I often do before bed, and I came across this adorable craft for boys. I followed it back to Doodles and Jots, and decided to create my own.

Doodles and Jots
I only make 6 (since that's how many caps I had here lying around) but hope to make more at some point. I also found that the caps I used, off Kirkland water, weren't quite sturdy/large enough, since the popsicle sticks tend to fall out when Aiden is playing with them. But with all the coke caps I have around here, I might just switch them out once I enter in those coke rewards online...

All cut and and ready to go!
Cute!
All in all, Aiden enjoyed playing with them!


Also, if you remember the green side table I refinished, I mentioned in that post about the weird residue in the drawers and how I planned on covering them up. Pintrest to the rescue again... I was originally planning on just using spray adhesive to line them with fabric; but on one blog, they had the idea to use foam board and just wrap the fabric around that to insert into the drawer. Unfortunately I didn't pin it when I saw it, so I'm not sure where it originally came from (if you've seen it somewhere, please let me know so I can give the proper credit!). I bought foam board on sale from JoAnn's (4 @ $1.99 ea), and already had the spray adhesive and fabric, so I got off pretty cheap! Now we use it to store all Aiden's puzzles so there is more room in his playroom for actual toys!


Sunday, August 12, 2012

Finished!

We finally finished the huge sideboard piece we found at an estate sale... If you remember, it looked like this before:


What a difference!
And now:


I know it doesn't look like much of a difference, but in person, you can see how much it cleaned up... it looks fresher (does that make sense?). I used a warm cherry poly-shade (stain and poly in one) and it turned out pretty good. The only weird part is the legs; they soaked up the stain so much that it barely looks like it was stained in the first place. I think I'll have to put a few coats of varnish on them to help shine them up a bit... hopefully that helps!


We also picked up a new dresser for Ava at the one and only sale we went to yesterday (it was quite the drive out there) and I hope to have pictures up of that soon too.

Friday, August 10, 2012

Newest Makeover

This past weekend, we took my sister to estate sales with us (her first ever!) and didn't have much luck with finding anything. She only ended up with one thing (a book from 1920) and we found this....

New side table
It was only $20!! I loved the green paint on it, but once we got a closer look, realized it wasn't done very well. It looked like they painted it an aqua color then went over it with a darker stain/paint... but you could see all the brush strokes and it just looked.... ugly. So we figured we could do something with it. On the inside of all the drawers, there was this weird circular pattern, that they had hidden by brown paper bag liners. Still have no clue what was in there, but it's in every drawer and it's really hard to get out. I tried sanding, scraping, yelling sawing... and it won't come out. I think I'll eventually cover them up with fabric liners. I stripped the old paint off and we discovered it was veneer underneath. It also had really cool brass feet (also painted). Then all I did was put a few coats of poly on, and voila! Done!

Found a spot for it in the front entry
I don't know WHAT they had in here....
Love the zebra/animal print pattern of the veneer

Bought the glass knobs at Home Depot for I believe $4 each
Nice pattern to the top also

I also finished the huge sideboard piece this week, and hope to put the "after"pictures up sometime this weekend. J and I are also going to a few sales tomorrow on the lookout for a new dresser for Ava or some bookshelves for Aiden, so maybe I'll have more projects to showcase!!